PC Builder MW Docs
Everything you need to set up, configure, and get the most out of PC Builder MW on Shopify.
Get up and running on Shopify
Install from the Shopify App Store
Click Install on the Shopify App Store listing. Approve the permissions in your Shopify admin. The app installs in under 30 seconds and appears in your sidebar under Apps.
Open PC Builder MW
In your Shopify admin, go to Apps → PC Builder MW. You will see the main dashboard with your widgets list and order analytics.
Create Your First Widget
Click "Add Widget" and give it a name (e.g. "Gaming PC Builder"). Each widget is a standalone configurator you can embed on any page.
Add Steps & Assign Products
Create steps for each component category (CPU, GPU, RAM, etc.). Assign your Shopify products to each step. Use CSV import for large catalogs or AI fill to auto-populate.
Set Compatibility Rules
Define rules that control which products work together. When a customer picks an incompatible combination, the app warns them before checkout.
Embed on Your Store
Click "Add to Theme" to add the PC Builder section block to your Shopify theme editor. Drag it onto any page — no coding required.
How to Set Up Your Gemini AI Key
PC Builder MW's AI fill feature uses Google Gemini to automatically generate product descriptions, compatibility notes, and category data for your components — saving hours of manual setup. Follow these steps to get your free Gemini API key and activate it in the app.
Part 1 — Get your Gemini API key from Google
Go to Google AI Studio
Open your browser and go to aistudio.google.com
Sign in with your Google account. Google AI Studio is free to use and provides access to the Gemini API.
Free — no credit card neededClick "Get API Key"
In the left sidebar or on the welcome screen, click “Get API Key”
This takes you to the API key management page where you can create and manage your keys.
Create a New API Key
Click “Create API Key”
Choose "Create API key in new project" if this is your first time, or select an existing Google Cloud project. The key is generated instantly.
Copy Your API Key
Your new API key will appear on screen. Click the copy icon to copy it.
Store it somewhere safe — Google will not show it again after you close the dialog. If you lose it, you can always generate a new one.
Keep your key private — do not share itPart 2 — Add your key to PC Builder MW
Open PC Builder MW Settings
In your Shopify admin, go to “Apps → PC Builder MW”
Then navigate to Settings in the PC Builder MW sidebar. You will see the AI Configuration section.
Enable "Fill with AI" and Enter Your Key
Toggle on the “Fill with AI” switch.
A text field will appear for your API key. Paste the Gemini API key you copied from Google AI Studio into this field.
Click "Save and Fill"
Click the “Save and Fill” button.
The app will use your Gemini key to automatically generate product descriptions, compatibility notes, and category data for your components. This can save hours of manual data entry.
This may take a moment for large catalogsSave Your Settings
Click the “Save” button in the top right to confirm your settings.
Your Gemini API key is now active. The AI fill feature is available whenever you add or update products in your widgets.
💡 Tips for using AI fill
- Run AI fill after importing your full product catalog — not one product at a time
- Review AI-generated descriptions before going live, especially for high-value SKUs
- You can re-run AI fill any time to update descriptions when you add new products
- Google's free Gemini tier is sufficient for most store setups — you likely won't need to pay
- Pro plan users can skip this — built-in AI is included with no key required
Configuring the builder
Component Steps
Go to your widget → Steps to add, rename, reorder, or remove component categories. Mark steps as required or optional.
Compatibility Rules
Go to your widget → Compatibility to define which products can be selected together. Use include or exclude rules. Bulk import via CSV for large rule sets.
Pre-built Templates
Add curated build templates in your widget → Templates. These appear as "Start from a template" options that customers can customize.
AI Fill Configuration
Go to Settings → AI Configuration to add your Gemini or OpenAI API key. See the Gemini setup guide above for step-by-step instructions.
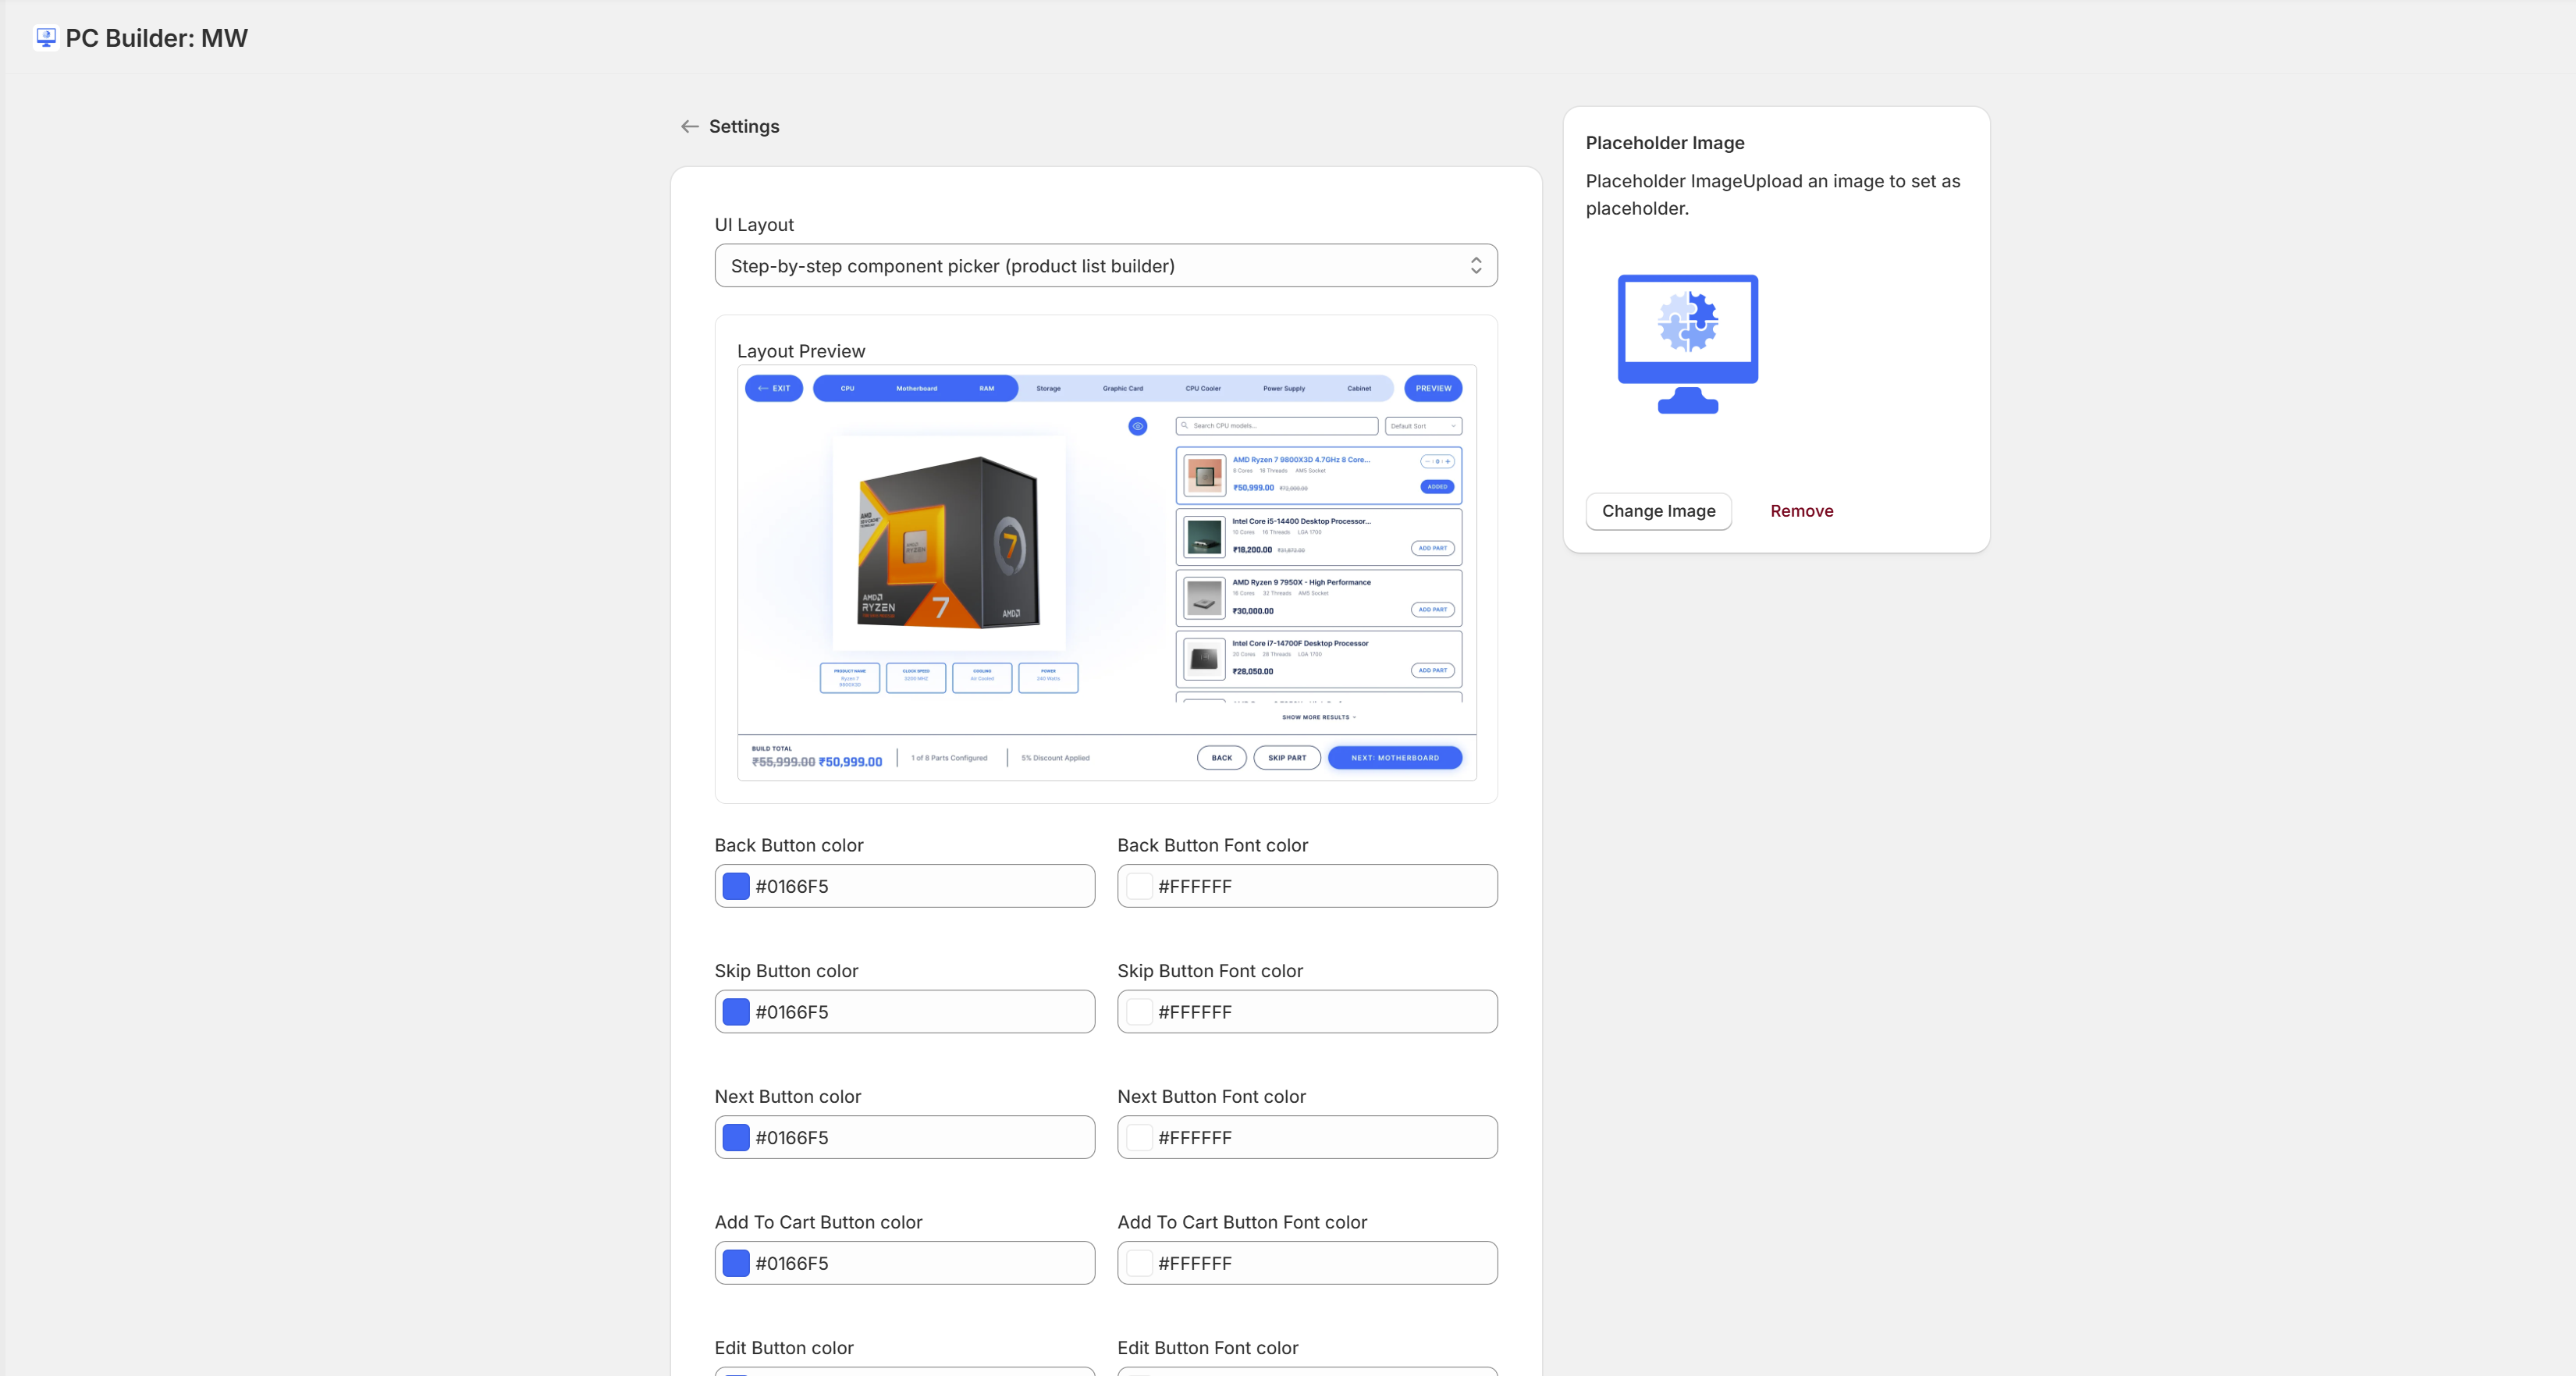
Widget Appearance
Customize colors, fonts, and layout in Settings → Appearance. Changes apply to all widgets.
CSV Import / Export
Download the CSV template from any widget, fill it in with your products and rules, then upload. Best approach for large catalogs.
Frequently asked questions
Does the app slow down my store?
No. The builder only loads on pages where you embed it. It is lazy-loaded, so it has zero impact on your homepage or other pages.
Can I use it with any Shopify theme?
Yes. PC Builder MW works with all Shopify themes including custom themes. It uses the Shopify section block system — compatible with Online Store 2.0 and earlier themes.
How do compatibility rules work?
You define rules in the admin (e.g., "only show AM5 motherboards when an AM5 CPU is selected"). When a customer selects a component, incompatible options in other steps are automatically hidden or greyed out.
Can customers save their builds?
Yes. Each build gets a unique shareable URL. Customers can bookmark or share their configuration. Builds persist as long as the session is active.
What happens when a product goes out of stock?
Out-of-stock products are automatically hidden from the builder. When stock is restored, they reappear automatically. No manual intervention needed.
Is the builder mobile-friendly?
Yes. The builder is fully responsive and optimized for mobile. Every step, product card, and checkout flow works on any screen size.
Which AI providers are supported?
The app supports Google Gemini API keys (recommended) and OpenAI API keys on the Basic plan. The Pro plan includes built-in AI access with no key needed.
Is my Gemini API key stored securely?
Yes. Your API key is encrypted and stored securely. It is only used to make AI fill requests and is never exposed to customers or third parties.
Does using the Gemini API cost money?
Google provides a free tier for the Gemini API that covers a generous number of requests per month — more than enough for typical product catalog setup. You only pay if you exceed the free tier limits.
Can I use my own API key with the Pro plan?
Yes. Pro plan includes built-in AI, but you can also use your own Gemini or OpenAI key if you prefer.
Still need help?
Our support team typically replies within 24 hours. Pro plan gets 8-hour priority responses.